In this tutorial, we will learn how to import data from a MySQL database into the SPSS statistics package. Specifically, we will detail how to set up a MySQL data source and how to import data from it. To follow along, you’re going to need your database IP address, and the username and password you use to access it.
Setting Up a MySQL Data Source
We’re working on the assumption that you have fired up SPSS, and you’re looking at an empty Data View. You should also note that these instructions are designed for the Windows operating system.
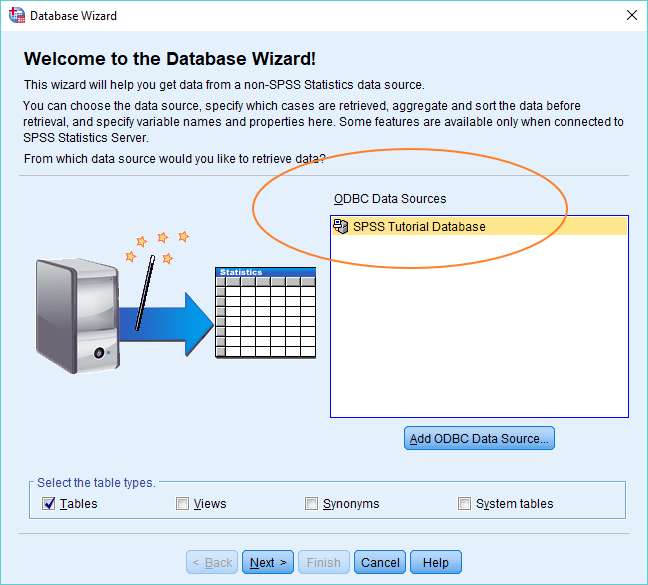
Click on File -> Import Data -> Database -> New Query. The Database Wizard will appear, looking like this.
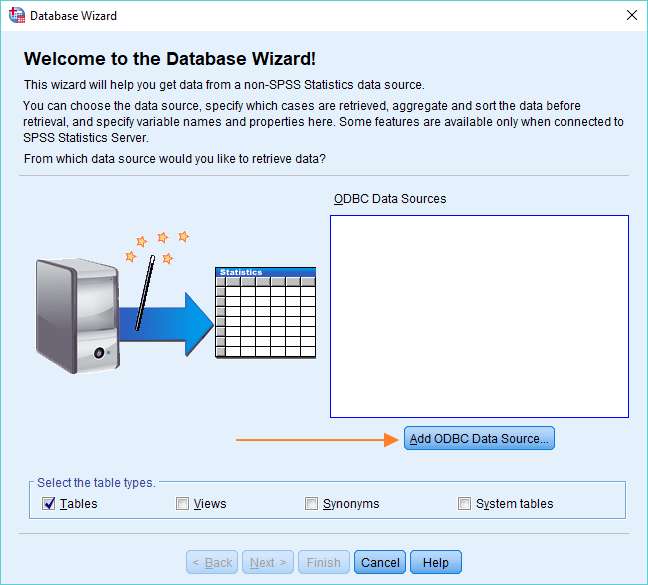
Assuming you haven’t previously set up a MySQL data source, click the Add ODBC Data Source button. A new dialog box will pop up (see below), and it’s from this dialog that you can add an ODBC connection to your MySQL database.
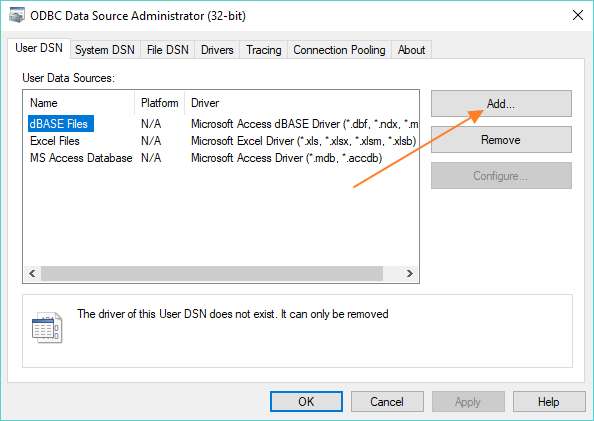
Hit the Add button, and yet another dialog box will appear. This one lists all the different database drivers (the code that allows an operating system to communicate with different kinds of database) that are currently available on your system. You might see a couple of MySQL drivers and maybe an assortment of SQL Server drivers.
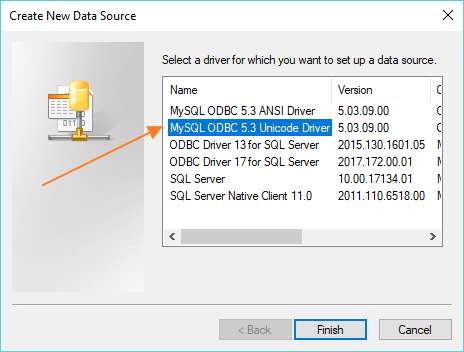
If you don’t see the MySQL drivers, then you need to download them from the MySQL web site. There is something important to note here. You must choose the version of the driver that corresponds to your version of SPSS. If your version of SPSS is 32 bit, then you need the 32 bit driver. If it’s 64 bit, then you need the 64 bit driver.
Once you’ve installed the driver on your system, it will appear in the Create New Data Source list. Double-click on the MySQL driver (the Unicode Driver, if you have a choice), and it will bring up the Connections Settings dialog box. This is where you enter the connection settings for your database.
Connection Settings
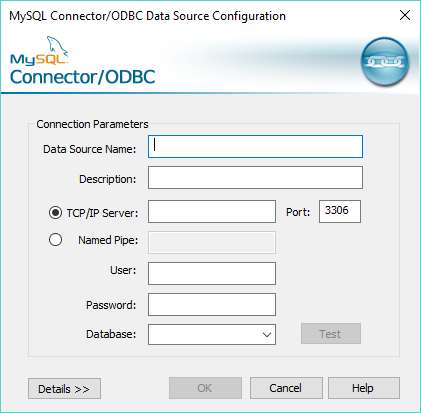
Use a memorable name for your Data Source (for this tutorial we used SPSS Tutorial Database). Enter the IP address or domain name associated with your database into the TCP/IP Server text box, and fill in your username and password. You should now be able to select your database from the drop down list at the bottom of the dialog box. If you click Test, it will tell you if the connection has been successfully established.
Now press OK, and you’ll see that the data source has been added to the list within the ODBC Data Source Administrator dialog box. If you double click on your newly created source, it should appear as a connection option in the SPSS Database Wizard.
Connect and Import Data
Make sure your newly created (or existing) data source is highlighted in the ODBC Data Sources window (see above), and click the Next button. This will connect to the database, and bring up the Select Data dialog box.
On the left hand side, you’ll see a list of the tables that are available within the database. If you click on the + icon(s), you’ll get a detailed view of the fields present within each table.
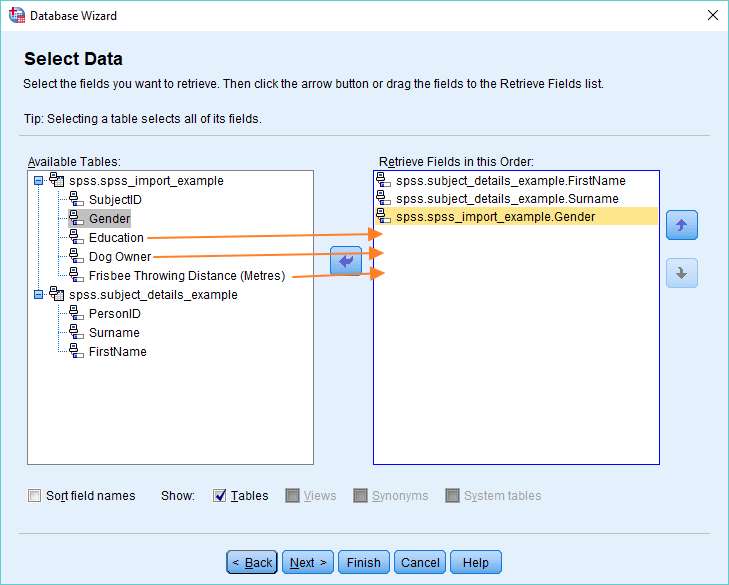
For the purposes of this tutorial, we have two tables available to SPSS, the first containing the details of a hypothetical experiment to do with dog ownership and frisbee throwing, and the second containing the names of the people taking part in the experiment. The tables are linked by the fields SubjectID and PersonID.
SPSS allows you to choose which fields to import into its Data View. We’re going to import FirstName, Surname, Gender, Education, Dog Owner, and Frisbee Throwing Distance (Metres). You can either drag and drop (from left to right) or use the arrow in the middle of the dialog. You can reorder these fields using the up and down arrow buttons on the right. When you’ve got everything set, click the Next button.
Specify Relationships
Okay, so the Specify Relationships dialog box is a little scary. We’re not going to examine it in detail, because if you’re using a database with more than one table, then likely you already know about the various relationships between tables and how structured query language handles those relationships. Moreover, if you’ve only got one table, or you only selected the fields from one table, you’re not going to see this dialog box at all, so you can just skip this section.
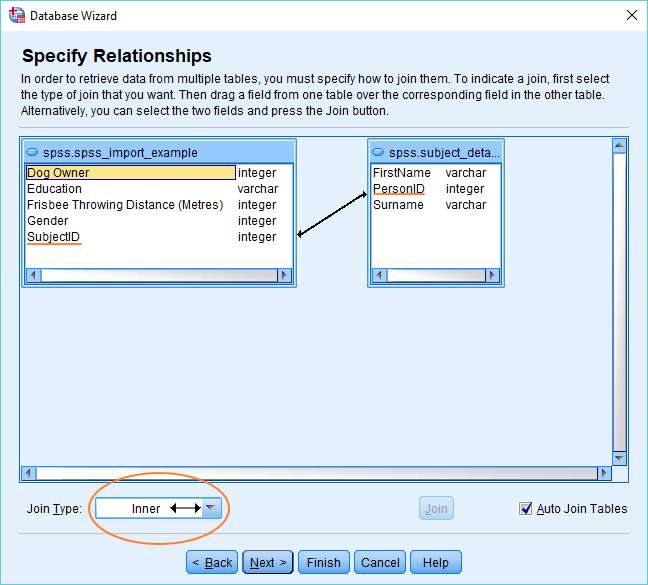
It is worth saying a couple of things here. The first is that SPSS will try to figure out the relationship(s) between your tables via its Auto Join Tables function. In this case, it has successfully detected that the two tables are joined via the SubjectID and PersonID fields.
It is also possible to specify a relationship manually. If you untick the Auto Join Tables option, click on a field in the left hand box, and then drag it over a field in the right hand box, SPSS will set up a relationship between the two fields. You can specify the nature of the relationship – Inner, Right Outer, Left Outer – using the Join Type drop down list.
We’ve selected Inner Join here to ensure that a subject appears in both tables before being included in the data set. Why have we done this? Well, consider, for example, that we might have data about the frisbee throwing abilities of thousands of people, but that only those people who have a corresponding entry in the Subject Details table are part of our study. Inner Join means that it’s only this group of people, who feature in both tables, that will end up in the finished data set.
If you’re happy that you have set up the relationship(s) between your tables correctly, press the Next button again. This will take you to the Limit Retrieved Cases dialog box.
Limit Retrieved Cases
This dialog box allows you to limit the amount of data being imported into SPSS on the basis of criteria that you specify.
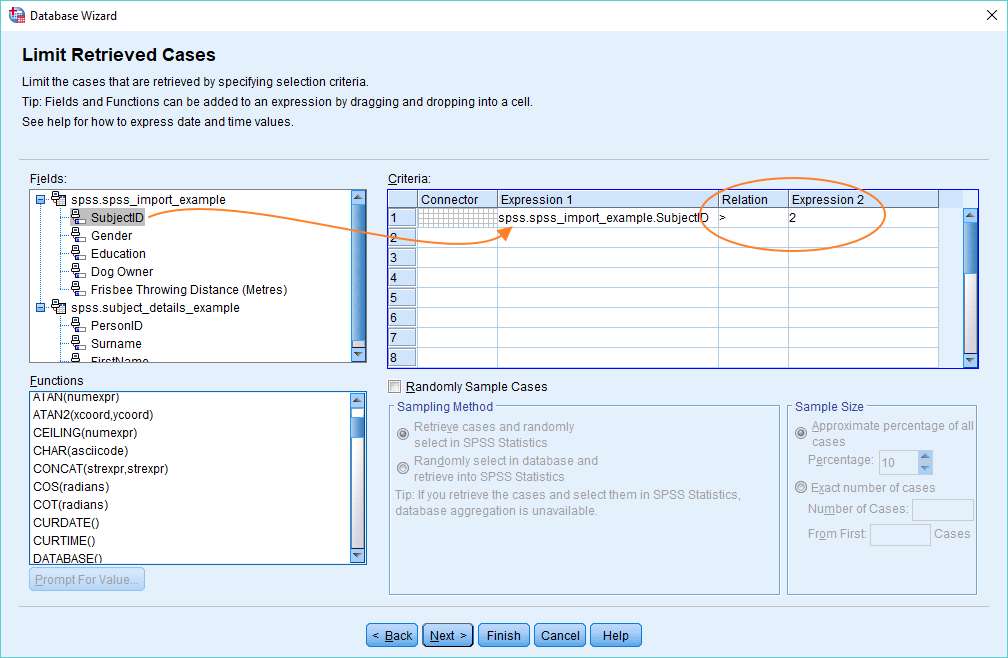
You can see that we’ve got a criterion that states that cases will only be retrieved if SubjectID is greater than 2. This is easy to set up. You just drag SubjectID from the Fields list into the Expression 1 column on the right, then specify greater than (>) in the Relation column drop down list, and type “2” into the Expression 2 text box (remembering to hit Return when you’ve typed it).
It’s also possible to retrieve a randomly selected subset of your dataset. Just select the Randomly Sample Cases option, and then choose to import either a percentage of total cases, or an exact number of cases.
Define Variables
The final screen you’ll meet in this tutorial before importing your data into SPSS allows you to define a number of variable parameters for your data. Click on the Next button to bring up this screen.
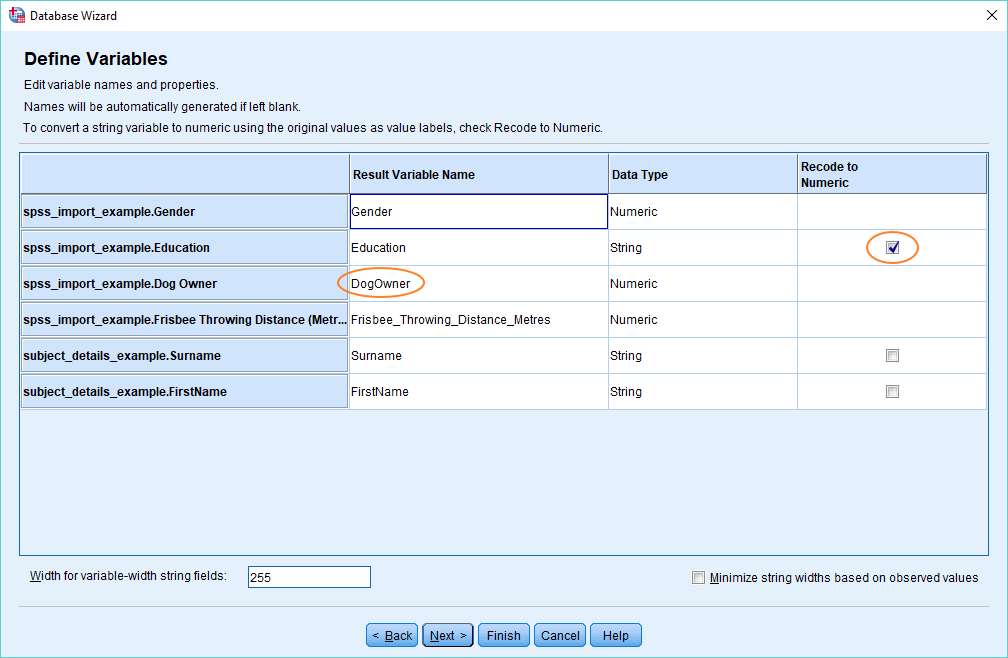
This is mainly self-evident. You can specify the names of variables (we’ve changed SPSS’s default “Dog_Owner” to “DogOwner”), and choose to recode variables from String type to Numeric type (which is best practice for categorical variables).
Import Data
It’s now time to import the data into SPSS. Click on the Finish button, and wait for SPSS to work its magic.
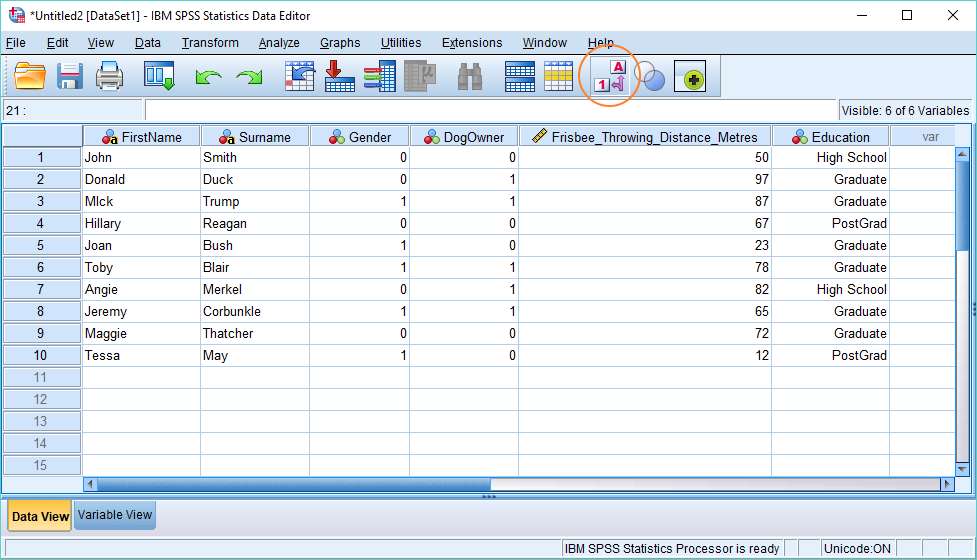
And there it is. The data has been successfully imported from MySQL into SPSS, and is visible in SPSS’s Data View. It’s worth noting that if you chose to recode numeric variables, it’s still possible to view their original values by hitting the value labels toggle button (circled in red above). Also, if you click on the Variable View, you’ll be able to examine (and edit) the value labels that SPSS has set up for you.
***************
That’s the end of this tutorial. You should now have enough knowledge to get started with the process of importing data from a MySQL database into the SPSS statistics package.
EZSPSS on YouTube
Check out our YouTube channel for video tutorials, including the companion tutorial to the above post.